Shopify
Shopify provides access to add HTML and JavaScript to your shop’s themes and to add conversion tracking upon successful checkout. Let’s use that ability to add Kissmetrics tracking to important e-Commerce activity.
Part 1. Place the JavaScript Library in your shop’s theme
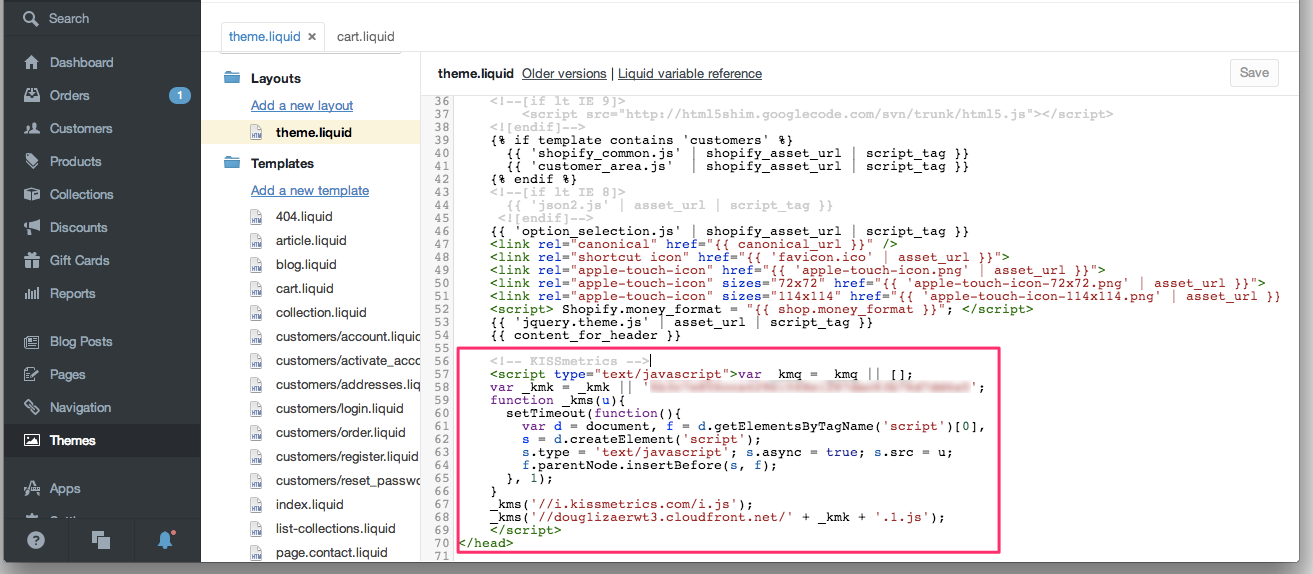
- Go to the theme editor at https://myshopify.com/admin/themes.
- Open
theme.liquidor the layout that is used in all the pages of your shop. - Add your JavaScript snippet to the bottom of the
<head>of the layout, as shown below. - Remember to use your JavaScript snippet, which contains your unique API key rather than 'foo'.
Code Template
<!-- Inside theme.liquid -->
<head>
  ...
  <!-- Kissmetrics -->
  <script type="text/javascript">
  var _kmq = _kmq || [];
  var _kmk = _kmk || 'foo';
  function _kms(u){
    setTimeout(function(){
      var d = document, f = d.getElementsByTagName('script')[0],
      s = d.createElement('script');
      s.type = 'text/javascript'; s.async = true; s.src = u;
      f.parentNode.insertBefore(s, f);
    }, 1);
  }
  _kms('//i.kissmetrics.io/i.js');
  _kms('//scripts.kissmetrics.io/' + _kmk + '.2.js');
  </script>

<script src="https://cdnjs.cloudflare.com/ajax/libs/jquery/3.2.1/jquery.min.js"></script>
</head>
Part 2. Modify the cart to also include the customer’s anonymous identity
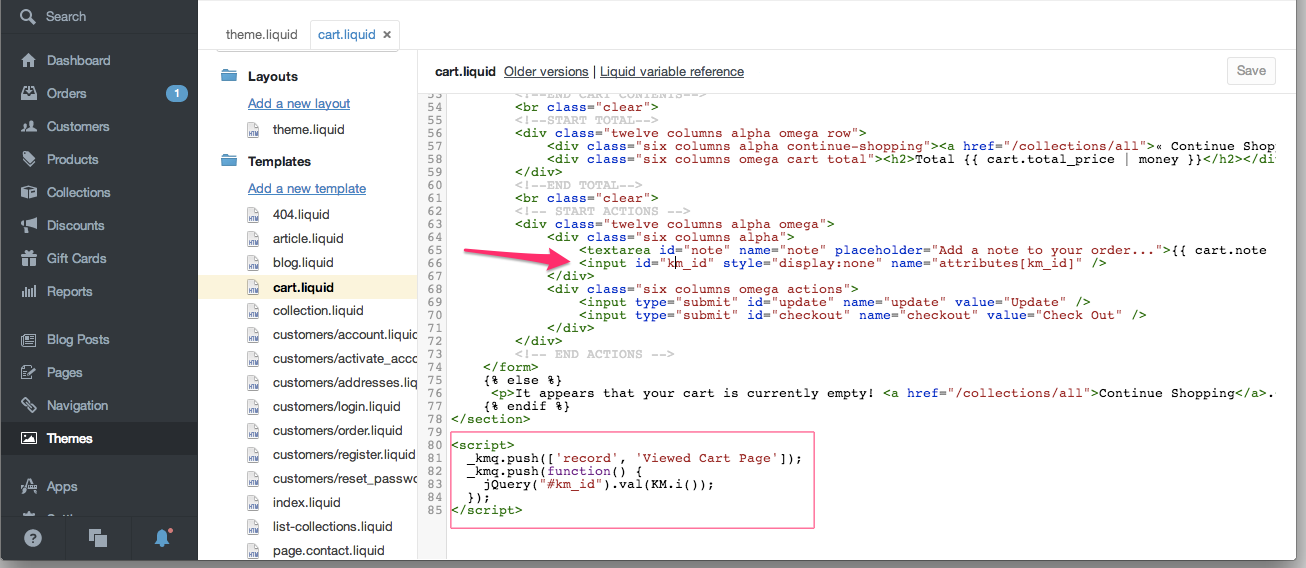
- Still in the theme editor, open cart.liquid (or main-cart-items.liquid in the new versions).
- As shown below, add a hidden
<input>field to the cart form (<form action="/cart">). This field will pass along the customer’s Kissmetrics anonymous ID as an extra cart attribute. In our example, I’ve placed the input beneath the area for order notes. - Place the custom JavaScript at the bottom of cart.liquid(or main-cart-items.liquid in the new versions). This does the actual work of assigning the identity to the hidden field.
- The event to record that the customer Viewed Cart is helpful, but optional.
Code Template
<!-- Inside cart.liquid -->
<form action="/cart" method="post">
   ...
   <textarea id="note" name="note" placeholder="Add a note to your order...">{% raw %}{{ cart.note }}{% endraw %}</textarea>
   <!-- Kissmetrics ID here -->
   <input id="km_id" style="display:none" name="attributes[km_id]" />
   ...
</form>
<script type="text/javascript">
  _kmq.push(['record', 'Viewed Cart']);
  _kmq.push(function() {
    jQuery("#km_id").val(KM.i());
  });
</script>
Part 3. Record the purchase on the order confirmation page
- Head to <https://myshopify.com/admin/settings/checkout> to modify your checkout settings.
- In the section “Order status page”, under “Additional content & scripts”, paste the sample from below.
- Again, remember to use your JavaScript snippet, which uses your unique API key rather than 'foo'.
- The last 3 lines of JavaScript make sure that the person’s ID stays consistent between your shop’s domain and checkout.shopify.com. It will record the event “Purchased”, and the total cart amount as the “Billing Amount” property.
Code Template
<script type="text/javascript">
var _kmq = _kmq || [];
var _kmk = _kmk || 'foo';
function _kms(u){
  setTimeout(function(){
    var d = document, f = d.getElementsByTagName('script')[0],
    s = d.createElement('script');
    s.type = 'text/javascript'; s.async = true; s.src = u;
    f.parentNode.insertBefore(s, f);
  }, 1);
}
_kms('//i.kissmetrics.io/i.js');
_kms('//scripts.kissmetrics.io/' + _kmk + '.2.js');

var KM_SKIP_VISITED_SITE=1;  // Prevent recording Visited Site on Shopify
_kmq.push(["identify", "{{customer.email}}"]);
_kmq.push(["alias", "{{customer.email}}", "{{attributes.km_id}}"]);
// Force the timestamp of the Purchase event to use the order creation date
_kmq.push(["record", "Purchased", {"Billing Amount":"{{order.total_price | money}}", "_d":1, "_t":Math.round((new Date("{{order.created_at}}")).getTime() / 1000)} ]);
</script>
Additional Notes
Updated 8 months ago
